Tag

peloton for less

Browsing

The 2nd most popular question I get (the first being about my disco ball) is about shoes and cleats. For the first couple of years after purchasing my Sunny I just wore my running sneakers and slipped my foot into the toe cage. It seemed fine and I was content but I did have a lingering curiosity.  After 525 rides on my Sunny I upgraded to a Keiser M3i which, like the Sunny, had toe cages on one side of pedal but also allowed me to “clip in” on the other side.  I finally took the plunge and bought some cycling shoes but holy smokes, the whole process was very confusing!!  Only certain shoes are compatible with certain cleats that are only compatible with certain pedals.  In fact, I initially even bought the wrong type.  Ugh. It was like learning a whole new language!  I thought I would share what I learned:

My readers are always on the lookout for a quality Peloton resistance conversion chart.  A copy of a resistance chart to complete the “Peloton Hack” is probably THE number one request I receive.  As I noted in my earlier “How to Measure Resistance with the Peloton App” post, the questions usually sound like this:

  • How do I  convert Peloton resistance to my Sunny or Keiser M3i?
  • Is it worth it to buy these fancy power pedals (pretty cool, check them out!)?
  • Is there anything similar to this Wahoo cadence sensor that will measure resistance?
  • How do I measure resistance on my Sunny?
  • How do I convert Peloton resistance when using my own bike with the Peloton App?
  • Should I just give up on life and buy one of these?  (Just kidding…)

Read on to learn more about resistance and see various Peloton conversion resistance charts for Sunny, Keiser, Echelon and NordicTrack spin bikes!

Hi gang,

Since upgrading from my Sunny to a Keiser M3i (after 525 rides, thank you very much) I started noticing people posting online these really cool looking graphs from mPaceline.  Intrigued I signed up for the free trial and then moved on to the yearly plan (it was something like $25 for the year). mPaceline is a cycling and running workout App designed to help you visualize your exercise/training metrics. The App works best if you are taking spinning or running classes that provide metrics on your class performance. It’s primarily focused on individuals that own a Peloton Bike, Tread or owners of 3rd-party equipment that use the Peloton Digital App with attached power and cadence meters (like my Keiser). 

Anyway, I started writing a post about all the things I enjoyed about the app but felt like I was falling short describing the awesomeness of this Peloton hack so I reached out to “RiderPaul”, the developer behind mPaceline, and asked that he author a guest post for my readers. I actually met Paul AFTER creating a dedicated mPaceline Facebook group after looking for some like minded users.  Come join – it has grown very fast and full of tips, tricks and helpful advice!

Below, Paul provides some basic information about mPaceline as well as equipment advice for those getting started with Peloton. 

Over to you, Paul:

Peloton recently announced that you could now finance the purchase of a new Peloton bike.  Is it a good deal? Here are my thoughts:

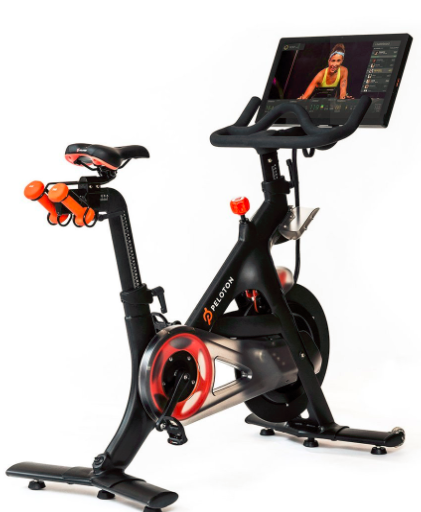
Buy Without Financing:  As detailed in my earlier  Peloton App blog purchasing a Peloton bike without financing costs about $3,000 when you add in delivery, $468 class subscription fees for the first year ($39 per month), $125 for clip-in shoes, exercise mat, etc.  Way outside of my budget.

0% APR Financing:  While a 0% down APR sounds like a great detail, the devil is in the details.  For qualified buyers, Peloton allows  you to make 39 monthly payments of $64 for the Peloton Bike+ or $49 for the Peloton Bike (the original). In addition to the cost of the bike, shoes, etc. to qualify for the 0% financing you need to commit to a 39-month class subscription of $39/mo. totaling $1,521.   By my math the grand total over the 39-month period will be almost a $4,053 – $4,455 commitment when you add all the extras.

Hey everybody!  I hope that everyone is staying safe, healthy and sane.

I decided to bring a little fun into my home gym and bought a really fun disco ball for my Peloton rides.  It is SO MUCH FUN!  I turn down the lights, crank up the music and turn on the disco ball – the pattern of the lights change to the beat of the music coming from the Peloton App.  It comes with a small remote that I keep with my bike.

I have added some pictures and videos.

I did it!  500 rides with my trusty Sunny Bike and the Peloton App (with the help of a global pandemic…).  There were no shoutouts from the Peloton instructors, no balloons or fanfare but just a GIANT sense of accomplishment!  I am SO happy to have hit this milestone.  I am in the best shape of my life and have found a new community of friends along the way.

Now that I have hit the 500 ride milestone I have decided to upgrade my bike.  My Sunny still works great but I have decided to buy something a  bit fancier now that I have proven to myself that I am in this for the long haul.  Believe me, the Sunny was well worth my initial investment – per my math, it came out to about $0.75 per ride!  Not too shabby.  Using your own bike with the Peloton App has a lot of advantages, price being one of them.

Peloton App + Sunny

After a lot of debate between a Peloton and a Keiser M3i, please read on to see why I decided to buy the Keiser….

Pin It