
Hi gang,
Since upgrading from my Sunny to a Keiser M3i (after 525 rides, thank you very much) I started noticing people posting online these really cool looking graphs from mPaceline. Intrigued I signed up for the free trial and then moved on to the yearly plan (it was something like $25 for the year). mPaceline is a cycling and running workout App designed to help you visualize your exercise/training metrics. The App works best if you are taking spinning or running classes that provide metrics on your class performance. It’s primarily focused on individuals that own a Peloton Bike, Tread or owners of 3rd-party equipment that use the Peloton Digital App with attached power and cadence meters (like my Keiser).
Anyway, I started writing a post about all the things I enjoyed about the app but felt like I was falling short describing the awesomeness of this Peloton hack so I reached out to “RiderPaul”, the developer behind mPaceline, and asked that he author a guest post for my readers. I actually met Paul AFTER creating a dedicated mPaceline Facebook group after looking for some like minded users. Come join – it has grown very fast and full of tips, tricks and helpful advice!
Below, Paul provides some basic information about mPaceline as well as equipment advice for those getting started with Peloton.
Over to you, Paul:
“mPaceline was created out of a love of spinning. The developer and his wife bought a Peloton Bike and loved it from the start. However, like many others, they struggled to demonstrate to themselves that their training was paying off.
The focus behind creating mPaceline was to provide a tool that would demonstrate the hard work you are putting into your training is seen.
- Show you that all your hard work, sweat and sometimes tears, are paying off.
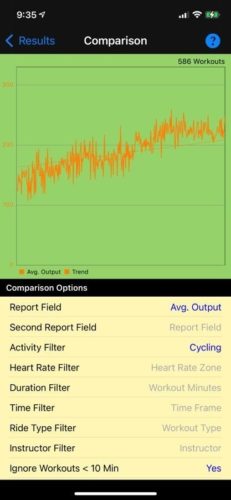
- Demonstrate that over time you’re able to produce a higher average output at a similar effort or average heart rate.
- Compare past workouts that you have done and see improvement across a variety of metrics.
- Highlight the instructors that motivate you to achieve your best efforts.
- Measure and support your training as you look to improve your overall health.
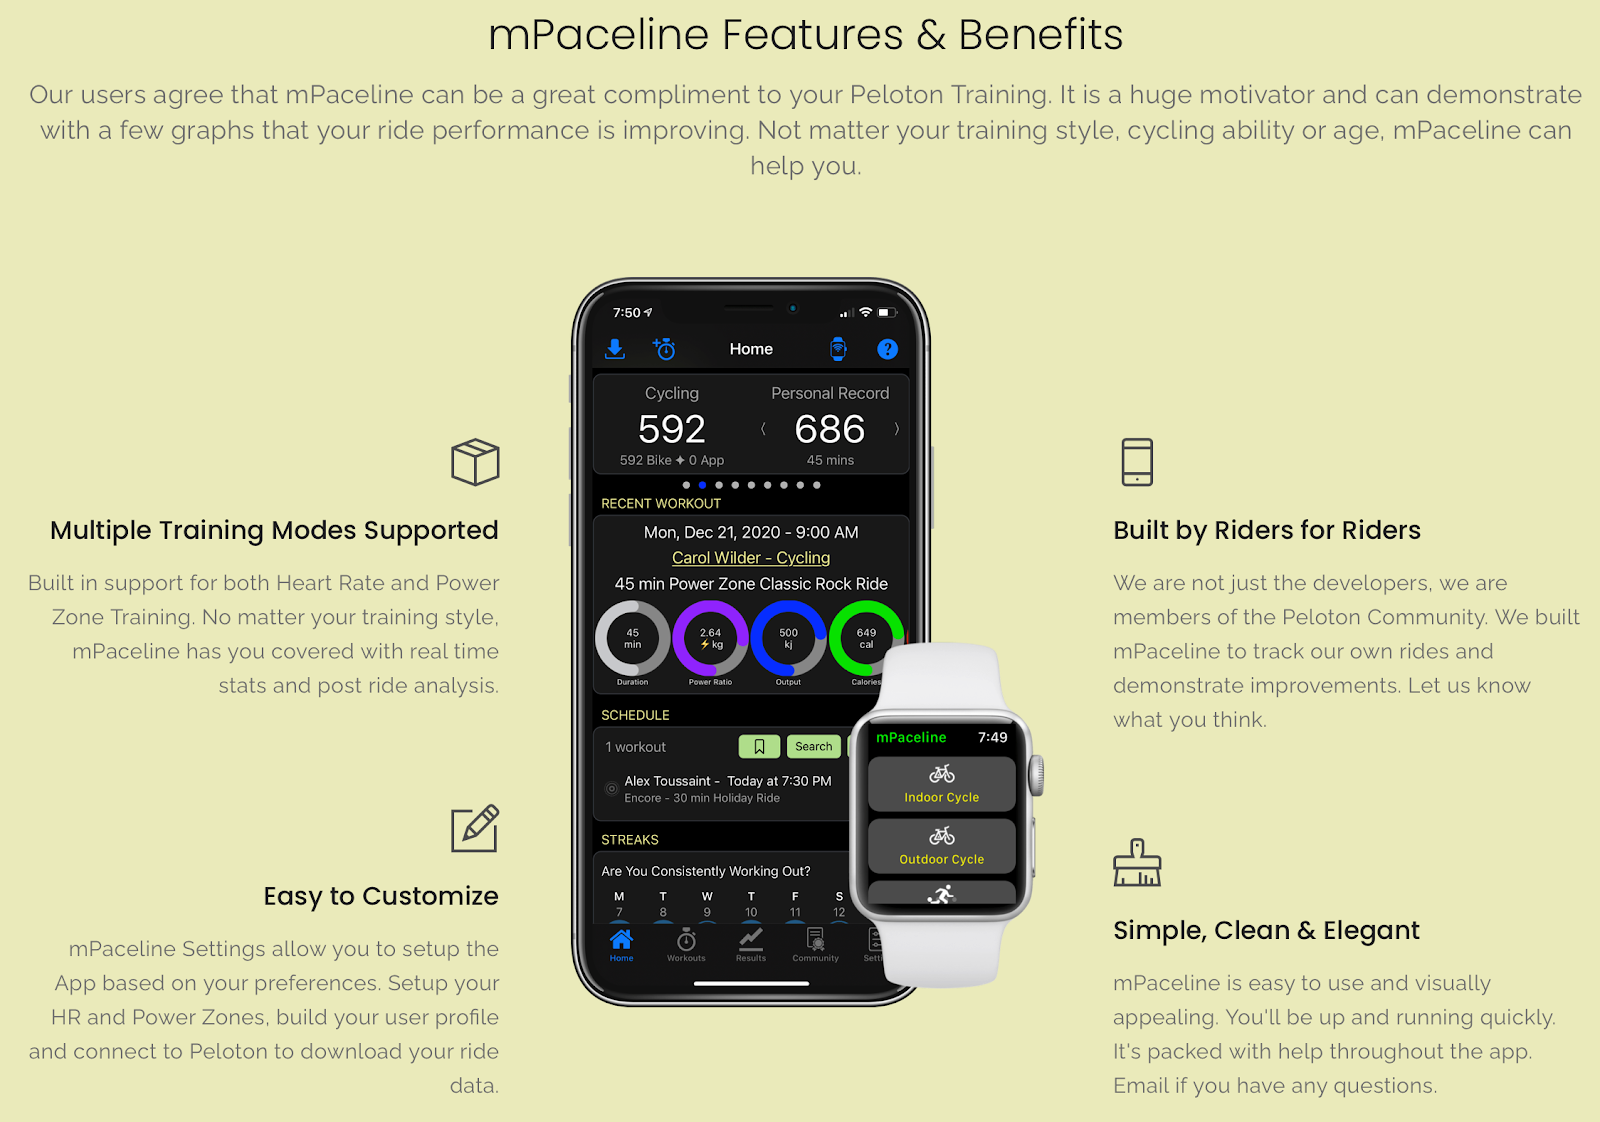
mPaceline is comprised of the iOS iPhone App that allows you to visually see all your workouts as well as an Apple Watch Companion App from which you can begin and monitor workouts on your wrist.
Workouts created by mPaceline are automatically saved in Apple Health and these workouts will contribute to your activities rings and be viewable in the Activity App.
Metrics are Key
A key strength of mPaceline is to capture the metrics from your equipment and show them to you in ways that help you demonstrate improvement. These metrics can come directly from the Peloton Bike or sent to mPaceline via Bluetooth meters attached to your third-party Bike.
- Power or Output – a measure of the power that you are generating on the Bike. It’s typically measured in watts and captured by a power meter on the Bike. Many bikes have a built-in power meter. For those that don’t you can connect pedals, cranks or other meters to your bike to capture power.
- Resistance – this is the measure of how much “drag” you are putting on the bike. This drag is created either through magnetic resistance or via physical “braking” pressure on the spinning fly wheel. The higher the resistance, the more difficult it is to pedal.
- Cadence – a measure of how fast you are pedaling. Typically stated in revolutions per minute (RPM)
- Heart Rate – The speed at which your heart beats over the course of the workout. You can also compute your average and maximum heart rate.
- Calories Burned – the number of calories burned during the workout.
- Duration – the length of the workout in minutes.
- Distance – how many miles you travelled.
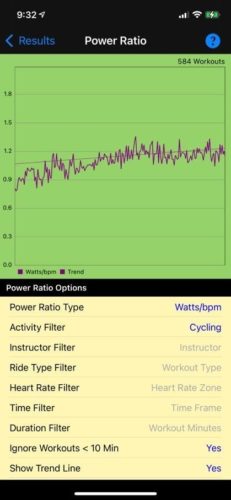
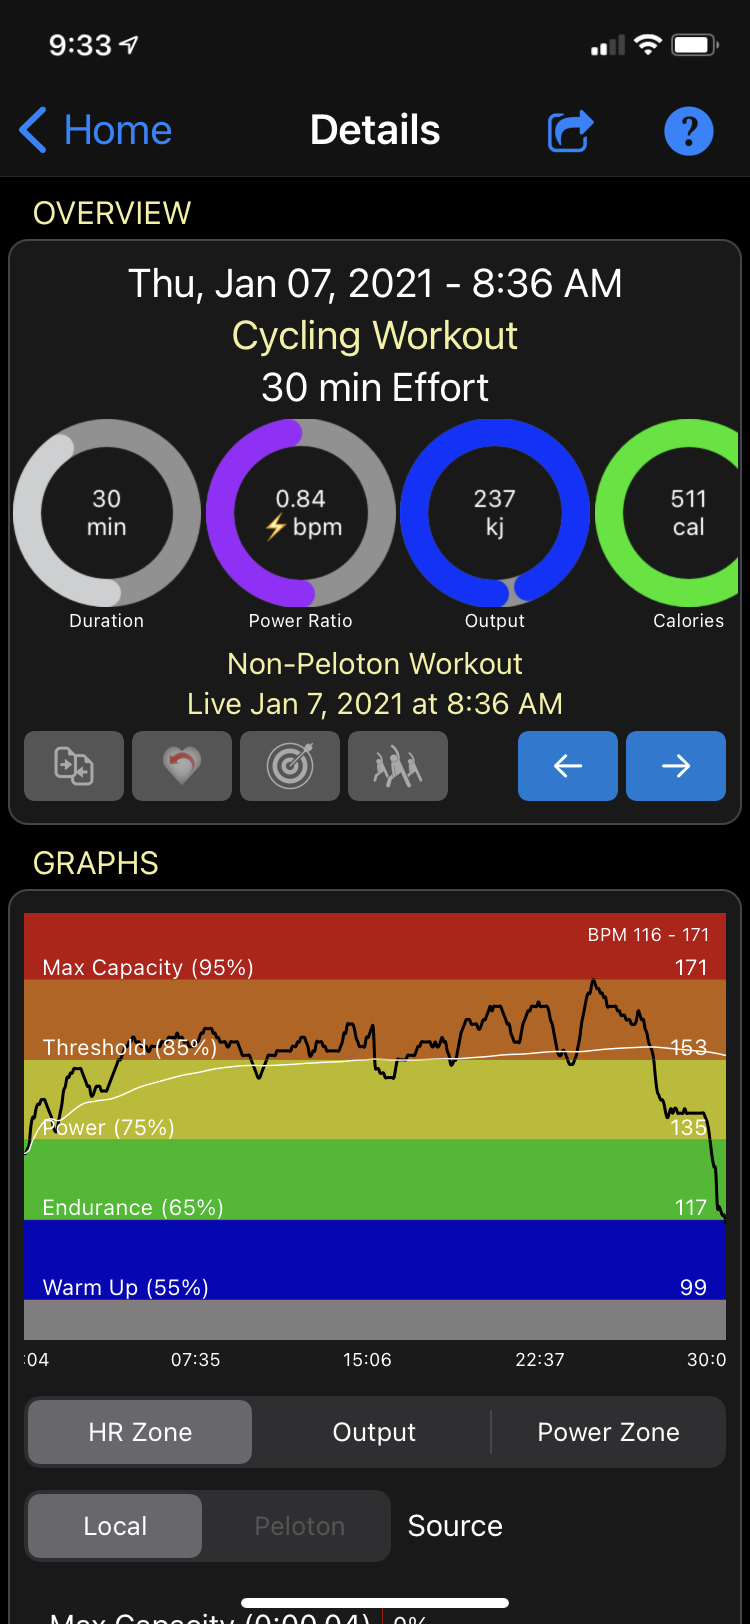
mPaceline captures all of these metrics and can show them to you in ways that can be extremely helpful. A couple examples here are mPaceline’s Power Ratios. There are two of these calculated for each workout. The first is Watts/BPM and the second is Watts/KG.
Watts/BPM takes the power you generated on the workout divided by your average heart rate. The other is power divided by your weight in kg. Any given data point is interesting, but when you start to chart these metrics over time you should see an increase in each of these ratios. The first one demonstrates overall heart strength. As your cardiovascular system strengthens, your Watts/BPM will go up. Similarly, as you get physically stronger, your Watts/KG metrics will improve. New mPaceline users love the Results graphs that clearly show these improvements and more.
Let’s be honest, working out consistently is difficult. Seeing improvement along these metrics is a key motivator and mPaceline can help here. That was the primary concept behind the App.
Graphs and Visuals
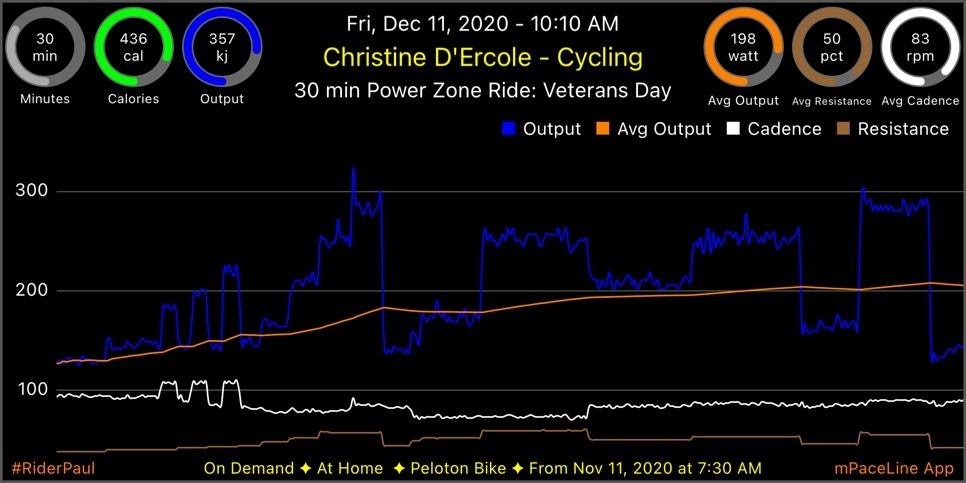
Everyone loves charts and graphs, especially when the graphs depict the effort that you put into your workout. Sharing and comparing these with other members of the Peloton community is a huge motivator. mPaceline can graph your Power, Cadence, Resistance and Heart Rate over your workout.
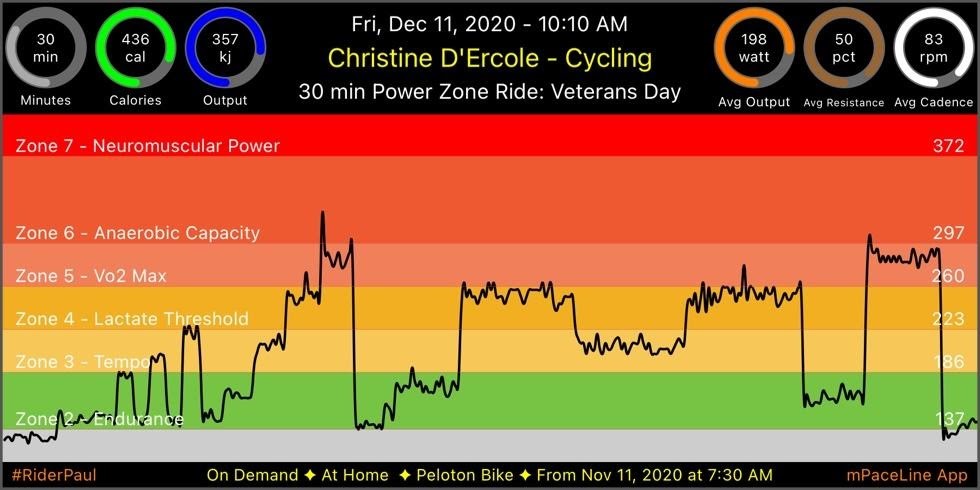
mPaceline has built in support for Power Zone training. This is a form of training in which the instructor calls out specific power zones (1 to 7) which each relate to ranges of power as measured on your Bike. If the instructor tells the class to go to zone 3, each person increases cadence and/or resistance until the power on the bike is within their power range for zone 3. What’s interesting about this training is that each zones power range is specific to each individual in the class. Peloton has a test class that you take to determine your specific ranges of power for each zone. These get plugged into mPaceline and you can create graphs like the one below.
Bike configurations supported by mPaceline
There are really three typically scenarios that you will run into when deciding what equipment to purchase to support your Peloton training. mPaceline can be used in each of these scenarios.
Peloton Bike – the first is for those of you that decide to go all in on the Peloton Experience. The Bike, classes and community. While this may be the most expensive scenario, it’s the simplest approach to get mPaceline up and running. Here, you do your workouts on the Peloton and simply download your data into mPaceline, and you have access to all metrics and graphs described above.
*Recommendation: Peloton Bike or Bike+. If you need a true built-in power meter, swivel screen and better audio, go with the Bike+. However, the original Bike works just as well.
Third Party Bike with Power Meter – There are a number of third-party bikes that have built in power and cadence meters. These meters can be connected to Apps like mPaceline via Bluetooth. In this scenario, you will use mPaceline during your workout to capture data real-time from the Bike’s power meter. Once the workout is completed, you can view your metrics and graphs in mPaceline.
*Recommendation: Keiser M3i with mSeries Converter.
Third Party Bike without Power Meter – If you find that you have a Bike that doesn’t have a built-in power meter (like a Sunny), you can look at equipping your Bike with add on equipment. You can add cadence meters that measure the number of times you’re the flywheel turns, and you can add pedals or crank based power meters. Note that some of these power meters can get expensive so if measuring power is important to you, you might want to consider one of the other options above. Note that if you find that you have a Bike without Power Meters and you are not interested in adding these, you can still use mPaceline. It will limit some of the metrics that you can capture but there are still plenty of advantages of the App.
*Recommendation: Sunny or other entry level Bike. Additional Meters would include: Wahoo Cadence Meter. Either ASSSIMO Duo/Uno Pedals or Power Tap P2 Pedals. All of these are very simple to install and connect to mPaceline.
If you’re asking me which scenario to go with, I’d steer you towards the all in Peloton solution. However, I recognize that this may not make sense in all situations. The good news is that mPaceline has you covered no matter which direction you decide to turn.
Hope this has helped you learn a little more about mPaceline. If you are interested, please take a moment to visit our website at https://www.megsoftware.com. Or join the mPaceline Facebook community that Beth has created to help generate community support around the App.”
—————————-
There you have it my friends – a wonderful overview of the mPaceline App. Thank you so much Paul for the summary and contribution!
Happy spinning!
Beth
Disclaimer: My Sipping & Shopping blog is a participant in the Amazon Services LLC Associates Program, an affiliate advertising program designed to provide a means for me to earn fees by linking to Amazon.com and affiliated sites.